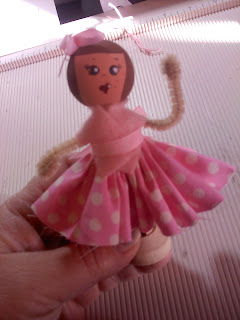
I made up 10 kits and made these two as testers. Remember, I have to keep these relatively simple for the girls who are anywhere from 6-15 years old. You of course can embellish them and make them even fancier, but these two little ladies are ready for a tea party!
Let's start with the supply list....For each doll, you will need one 1 1/4" round dowel end/clothespin doll head, a clothespin (of course) and a clothespin doll stand. (These are all generally available at your local craft store.), acrylic paint in a flesh tone of your choice, a hair color,red,black and white. A good flat paint brush, hot glue gun and glue, pipe cleaner of your choice, scraps of fabric and felt, 1/4" ribbon ( I used grosgrain) and a fine sharpie marker.
First thing you'll need to do is drill a hole in her upper shoulder area with a bit that is big enough to allow the pipe cleaner to pass through.
Heat up that glue gun.......put a bit of hot glue inside the head and add the clothespin. You can angle the head to make her look cute. Slip the bottom of the clothespin into the stand, this will hold up the doll while the paint dries on the head. Now paint the head the flesh color of your choice. I found they need 2 coats of paint. The paint does dry pretty quickly.
After the face paint dries, add the face. I put a dab of paint (black) on the pallete and dip the bottom of the paint brush handle in it and dot on the face for eyes. You'll do the same in red for the mouth, but you put 2 dots side by side and then pull down just a little to make a heart shape. In tole painting they call these Dolly Parton hearts! (giggle) When the dots all dry, take the sharpy marker and add the details. Mine are very simple faces, You can do whatever strikes your fancy...be creative!
A little dot of white in the eyes really bring them to life. You can also put a little shine with white on the lips you might like that too. To make the hair, I just painted a hair color in a little bob shape. You could add yarn, wool, or dolly hair. I drew the hair's outline on with pencil first because I do have a tendency to get a little crazy with the paint!
Now the fun begins! I cut a strip of fabric, there is no right or wrong here. Figure out how long you want your skirt and then cut about a 12" length. You do what works for you. You could even use netting or soft ribbon or wide lace. The choices are endless. I used embroidery thread to tie the skirt. I cut about an 6" length and knotted one end and threaded it on a needle. Gather the top edge of the skirt with this.
Now lay your doll on the skirt face down....arrange the skirt around her so it looks nice and covers her behind! Tie your strings together tightly and TaDaaa, she's wearing a skirt!
Now we'll put in the arms......pipe cleaner. Cut the pipe cleaner into 2 pieces, you only need half. Thread this through your drilled hole. Please be sure and line your face up so the holes are on the sides, you don't want arms coming out of her chest and back! Really you don't!
Now fold the ends in to form the hands. You'll fold them over twice. You judge how much.
 |
| Like this |
Cut a strip of felt, about 1" x 3" This isn't exact science so do it however you like! Wrap it around her neck, like a shawl, lap one side over the other. Add a dab of hot glue between the layers.
Now embellish anyway you like. I had some little jewels in my stash, and I tied a cute bow for her hair and she was ready to go to a party!
You can do a multitude of things with these little dolls. If you feel so inclined you can paint "shoes" on her leg ends. She would make a fabulous Christmas tree ornament, just add a tiny eye screw to the top of her head and hang her by a pretty ribbon. Dress her for any occasion, experiment with different hair material and styles. Go have fun, make an entire debutante's ball for lovely Clothespin dolls!


No comments:
Post a Comment