Welcome to My Bag of Tricks

This is a blog to share the things I discover, create and love. I have a passion for creating interesting things, and an equal passion for sharing how it's done! Join me on my journey, and watch what I'll pull out of my bag of tricks!

Wednesday, February 29, 2012

Little Buckaroos.....

I've decided to go into the business of making embellishments for people so they can make their own cards or put them in their scrapbooks or whatever.
The mascot for our schools is the Buckaroo....a fancy name for a cowboy really if truth be told, but everyone is a Buckaroo, be they in 1st grade or 12th...or even if you're grown. We even have a Buckaroo Blvd.
So I whipped up some little Buckaroo embellishments. These cowpokes will have some other small things to go with them, but I haven't decided yet which ones I'm for sure going to include.
Our colors are Black and Orange, thus the black and orange get ups. But I did some cowgirls in pink.....
These little Buckaroos even have silver belt buckles!
Stay tuned for how to make a little box from a walnut!  Really!

Wednesday, February 22, 2012

A Morning in The Life of Mi......Mimi

Every morning I have a little routine with the furry characters in my life. My little dog Alexander anxiously reminds me that we need to feed the Chickens, he hardly lets me get dressed and my morning rituals done before he's bouncing off the door and my legs...so it's off I go with a scrap bucket in hand.
First I feed my little pony......Esmerelda!  I love her, she makes little whickery noises and acts coy so I'll give her some oats.
The other day the geese came up and hissed and flapped their huge expanses of wings at her and tried to persuade her through intimidation to leave the hay so they could eat it.....Geese eat hay in the winter in case you didn't know.  Esmerelda was having none of that and a fight soon erupted! She backed up and wound up for an enormous kick, luckily the geese had moved. Such a squawking and flapping and hissing , kicking and bucking began, I just cowered in the hay barn behind my safe fence until she won!  The geese were incensed! But...today, they've made their peace...See!
Essy has her breakfast oats, Toulouse and Berliouse have their hay.  So on to the other chores.....
Anna always hangs out for some loves while I fill the water bucket for the chickens...
I'm trying to teach her not to jump on me........I'm trying....she's forgetting....but she's a sweetie anyway.
I'm  generally accompanied by one of our many cats, quite often Henry, he's the outdoorsman of the bunch.
Alexander is now about ready to explode and he gets right to work herding his chickens.
Alexander 

These are a few of the girls. 
And that's a morning in the life of Mi.....I love this life!

Tuesday, February 21, 2012

A Night Out With My Girls....LaTraviata....Art Gallery...

Jennifer and Chantelle
My  girls and I spent the weekend together and attended the Opera; La Traviata; and visited an art showing at the Covey Center for the Arts.  La Traviata was simply magnificent!  Jennifer's voice teacher had the lead...he is so handsome, and his voice is like butter. Of course the play is tragic, but all operas are.It was romantic and sweet and made us cry. Perfect! 
We all got dressed at Jennifer's apartment and to our surprise, we had all chosen red and black outfits.  We are so related.
Before the opera started, we attended a gallery showing of some amazing art and sculptures.  I snapped some pictures so I could share.


This horse was incredible. I was totally fascinated by its tail which is made  from motorcycle type chain.  Its hooves were pistons.  All the sculptures are made from mechanical bits and pieces. I had these visions of picking through some of the shop's old parts and crafting something too.   Hmmmm, I need to learn to weld.
This ostrich's body is a motorcycle gas tank......I bet we have one of those laying around.


The tree is actually made mostly from rebar, who would have thought to make something so lovely from rebar?  The man reminded us all of the commercial for the bladder control drug....You know, the people made of pipes! 

I absolutely love Dinosaurs and Dragons so I was tickled with these versions.

This was another horse they had on display.  He was selling for $7500, just not in my budget this year. 
I thought you might like to take a little gallery stroll without leaving your warm house.
Keep crafting!

Friday, February 10, 2012

Monkeying Around With a Honey of a Box.....

The Honey of a Box  turned out so nicely that I decided to put a new spin on it. I need variety for my Valentines!  I went out on a limb, and got wild with some luscious green BoBunny dotted paper that I picked up here in town at Unique Creations.  First I created the wee monkey with the Valentine...
Then I added some appropriate Valentine's Day embellishments to the two other sides. I'm leaving the back blank for giving purposes.
I have these adorable little letter stamps I used to stamp "love" on this heart, it needed something more.

Hugs and kisses...who doesn't like those?!
On the top/lid thing I embossed a little Valentine tag stamp from a "Stampin'Up set I have.  I love heat embossing! I used two sizes of tag shaped punches and there you have it, a cute lid embellishment!
Then I filled my monkey  boxes with Hershey's Hugs.......

10 Hershey's Hugs or Kisses fit very nicely in the box!
I put Bit-O'-Honey candies in the Bee Mine box.....mmmmm.......Bit-O'-Honey....
8 Bit-O'-Honey candies will fit this box if you fold the wrapper ends over.
 Here's my Valentine's Day line up.......All ready for the giving!
Hope this gave you some sweet ideas for Valentine's Day giving for your sweeties!
Now go whip up some happy!

Wednesday, February 8, 2012

Shape Card Obsession

I have come to the conclusion that I am obsessed with making shape cards! When I look at a potential new cartridge for my Cricut, I always am on the look out for images that can be converted into shape cards. Are they symetrical, are they large enough, will they look good on their own with a little embellishing?  It's gotten out of hand......SEE......


Even Baby Shape Cards!

Hmmmmm, Valentines Day is coming...............

Thursday, February 2, 2012

A Little Honey of a Valentine's Day Box......

In honor of Valentine's Day, I've created another little box for giving.  I've decorated it with a bee, but you could do with it as you like.
The box is 2 inches high and 2 inches wide with a flap lid.  I decorated it with red 1 3/4" squares of red paper and some little embellishments I made on my Cricut.
Here are the basic instructions so you too can make one of these honeys!

Cut a piece of heavy card stock to 8 1/2" x 7" (You need to use heavier card stock when making boxes so they are strong enough.)
Of course this project uses the scoreboard!  
On the 8 1/2" side, Score@ 1/2", 2 1/2",4 1/2",6 1/2" Don't flip this side.
On the 7" side, Score first @ 1/2" then 2 1/2" and flip the paper over and do the same on the other side. Trust me on this.
This is what you'll get, well not the lovely black dotted lines and numbers, but you get the idea, right?! Notice that one end of the paper has a 1/2" score, this will make the lip for your box top.
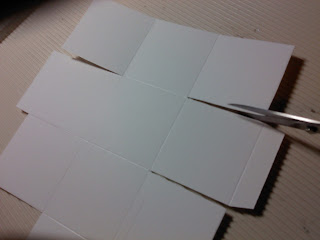
Now break out those scissors, we're going to do some cutting.
On the end with the 1/2 inch score, cut off the two outside squares, including the 1/2 on the sides. Like shown here.Next we'll cut in to make the box sides.
Cut the first square after the top flap to the middle, don't cut down from the flap, cut crosswise do this for the next  square, then clip off the 1/2 area on the top of your newly cut flaps, leave the one on the middle flaps.
It will look like this before you cut the 1/2 portions off.

This is what you'll end up with, minus the marks of course.

From here you need to prepare the box for folding properly by cutting little slivers from the sides of the outer flaps. Trim a sliver from each side of the 4 outer flaps and then on the 1/2" lip, cut a small corner off...like this:

See the small sliver removed on the sides. Do this for both sides.


Just clip the corner from the lip.

This is the shape you should have at this point.

Now fold and crease all the scored lines and you'll have something like this.....


Turn your box over and add adhesive to the right sides of the outer flaps, then turn over and carefully add adhesive to the lip, being careful not to get the other parts stuck to your work surface.
Now fold the flaps in and press together to adhere.....
And you'll end up with.......
You can do this next step either before you add the paper squares or after, doesn't matter, you'll just be punching twice if you do it first.
 Use a 3/4" punch to punch just a little half moon shape so it's easier to open the box.
Add your 1 3/4" squares of colored or decorative paper and a couple embellishments and VOILA' you have a honey of a little gift box.  I'm thinking of putting Bit O' Honey candy in these.


FYI: I used the Provo Craft Create a Critter cartridge for my Cricut, and Baby Steps for the words, The Colored paper is Stampin'Up Cherry Cobbler for the red with a variety of others for the embellishments, I used a white gel pen, Stickles glitter and some googly eyes I found at Dollar Smart in Blanding, UT.
Get Creating and watch for the next little goody I pull from my bag of tricks!