Welcome to My Bag of Tricks

This is a blog to share the things I discover, create and love. I have a passion for creating interesting things, and an equal passion for sharing how it's done! Join me on my journey, and watch what I'll pull out of my bag of tricks!

Wednesday, November 30, 2011

A Grand Opening!

So...I've been rushing about preparing and creating for the Vendor Fair coming up this Friday and Saturday on top of having Thanksgiving at my house (which if you know my amazing house keeping abilities, included a mad whirl of cleaning. I must publicly thank my awesome husband for helping!) Also I attended one of Jennifer's Choir performances in Orem, Utah at Utah Valley University on Monday night. It was beautiful by the way.  But I digress....The Grand Opening I speak of is at my friend Theresa's new second hand store. She took over from the previous owner and has turned the once frightening clutter into a marvelous second hand boutique of sorts. It's incredible!!! I admire her cleaning and organizational skills!  The Grand Opening is tomorrow December 1st, and includes some gorgeous gift baskets that we put together last night.  They are all reasonably priced and perfect for any type of gift giving.  We worked from 6:30 pm to midnight getting them all arranged and covered in shiny cellophane.
I had to snap some pictures of a few of them with my camera phone, really you must simply come down and see them and the store to really get the proper effect.
Three of the gift baskets on the mantle....which is also new!
A close up of the Snowman gift tray on the mantle.

The new fireplace and mantle
Just a few of the baskets above the baby clothes. adorable!!!

This Tigger basket is great, it has a talking Tigger, a Winnie the Pooh book and some really neat other gifts.

This little basket has a plush elephant and some other adorable baby gifts, including a baby giraffe.
You really must come to the store and see for yourself. And she's having a sale!!!! Who can resist a great sale!
See you at Second to None!!!!

Friday, November 18, 2011

Samantha's Doll

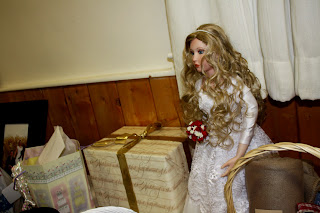
The "Porcelain" Samantha
For my birthday this year, my son and his wife wanted to know what I wanted...to be honest, I don't really know most of the time, and when I do, it's probably expensive...BUT, this year I knew exactly what I wanted from them (besides a Grandbaby) I wanted the pictures from their wedding on a disc. And wonderful kids that they are, that's exactly what I got!  I was perusing it today, and came across the doll I had created for Samantha. I copied her wedding dress as closely as possible in miniature and her hair. No doll will ever be quite as beautiful as she is, but I'm pretty proud of this one! 
The Real Samantha
Here she is with her bouquet sitting among the gifts..... You will notice she has long sleeves, this particular doll has 3/4 arms so you can't do short sleeves.

You can't see the bride without the groom!  
 
I don't do dolls like I did long ago, I miss teaching the classes, and sometimes I miss going to shows. I still do them for occasions like this and for specials orders.  In my room I have several dolls in various states of assemblage, I really should get them done!  I'm working on an Esmerelda Gypsy doll, I even have the fabric for her costume purchased.  I need more hours and less work!  
I'm thinking for Christmas....if I can pull it off, I may make a doll or two for gifts, just little ones. I don't think I can pull off a big production doll.  Now you've seen a side of me few get to see much anymore.

Wednesday, November 16, 2011

A Peek into My Creative Process...and stuff like that...

I've been busy creating things for a local Vendor's Fair the first part of December which explains part of the reason I haven't posted any new and fabulous stuff I've learned. It's because when you're doing stuff to sell, you do dozens of the same type thing, over and over and over...
When I'm designing something, I will get it just about where I want it, then I send a picture to one or both of my daughters and ask for their opinion.  They are invaluable when it comes to good ideas and critiquing.  I'll show you a couple pictures of the same little gingerbread man that I'm making to go on a tiny candy box.....


The question was....googly eyes or button style eyes.....Chantelle liked both!  So....I'll do half and half....what do you think?


(I do have a crazy work surface....I doodle and test on a big piece of white paper, and work with a teflon mat so the adhesive doesn't stick to my table and lovely white paper.)


Then it was on to the little reindeer....I just wanted to know if she liked it.....
She did, but suggested I add something...sooo, I added a couple holly leaves and bling berries...see!
Then she says, "You should really put it on some pretty paper, not that plain white stuff!"  "Ummmm, I'm just taking  pictures here Chany, not finished."  I did put it on pretty holiday paper, and I'll show you when I get all my boxes done. 
Here's the other project I've been working on too......
My lovely and wonderful daughter in law Samantha had a sister who had a precious baby die about a year ago, and for this Christmas Samantha decided to make an album of her baby for her.  I've seen the baby pictures, and they are just beautiful.  To help her out, I've been making some embellishments and words using my Cricut.....here's what I sent to Chantelle for critiquing......I passed inspection!  Happy me!
Keep creating, and I'll pull some more intriguing things out of my Bag of Tricks soon! 

Friday, November 11, 2011

Rubber Stamp Inspiration

I did tell you what started the whole candy box obsession didn't I?  I got the Season's Mini Catalog from Stampin'Up, opened it up and a beam of light shot from its pages and WAAAAA there was this most amazing stamp set.....Oh the marvelous creations that swam through my brain....I dreamed of the things I could do with it....I was in love....... Here my friends is my lovely, inspiring, amazing stamp set!!!
You can do all the holidays!!!! Oh the marvelous projects this little set brought to my mind, kept me awake even.  So I ordered it! 
With Stampin' Up's new acrylic style stamps; which are marvelous by the way; you just pop the image on the foam side and theoretically they will simply stick to the acrylic block.....well.....not always so I remedied this problem.....with THIS.....
Aleene's Tack-It Over & Over and a foam brush!  You just brush a nice coat on the image side not the rubber side, let it dry and there you have it, nice sticky stamps  that stick. Be sure and press the sticky side to the back of your hand a couple times. You do need to temper the tackiness.
(That sounds hilarious! Temper the Tackiness. Haahaa, I digress)
Just apply your stamp image side down to your acrylic block.....(I love Stampin'Up's acrylic blocks, they are a very good quality block that's easy to hold.)
Now stamp away!!!!!!

Thursday, November 10, 2011

Clothespin Dolls! So Sweet!

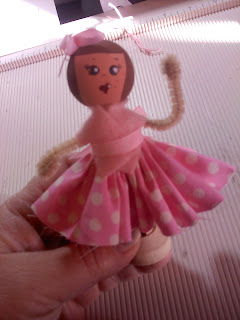
I do the crafts portion of an American Girls doll book club at our local library. I'm always looking for simple yet fun and adorable things for the girls to make. I generally make whatever we're doing into a kit so it's easier for them to do.  I was rummaging through my stash and came across those fun old fashioned clothes pins...who knows why I bought them years ago, maybe somebody gave them to me..You never know with my stash!  Anyways. I went on a quest to create the coolest clothespin doll ever, and after studying it out, I came up with this. Aren't they sweet?
I made up 10 kits and made these two as testers.  Remember, I have to keep these relatively simple for the girls who are anywhere from 6-15 years old.  You of course can embellish them and make them even fancier, but these two little ladies are ready for a tea party!
Let's start with the supply list....For each doll, you will need one 1 1/4" round dowel end/clothespin doll head, a clothespin (of course) and a clothespin doll stand. (These are all generally available at your local craft store.), acrylic paint in a flesh tone of your choice, a hair color,red,black and white. A good flat paint brush, hot glue  gun and glue, pipe cleaner of your choice, scraps of fabric and felt, 1/4" ribbon ( I used grosgrain) and a fine sharpie marker.
First thing you'll need to do is drill a hole in her upper shoulder area with a bit that is big enough to allow the pipe cleaner to pass through.

Heat up that glue gun.......put a bit of hot glue inside the head and add the clothespin. You can angle the head to make her look cute. Slip the bottom of the clothespin into the stand, this will hold up the doll while the paint dries on the head.  Now paint the head the flesh color of your choice. I found they need 2 coats of paint. The paint does dry pretty quickly.
After the face paint dries, add the face.  I put a dab of paint (black) on the pallete and dip the bottom of the paint brush handle in it and dot on the face for eyes. You'll do the same in red for the mouth, but you put 2 dots side by side and then pull down just a little to make a heart shape.  In tole painting they call these Dolly Parton hearts!  (giggle)  When the dots all dry, take the sharpy marker and add the details. Mine are very simple faces, You can do whatever strikes your fancy...be creative!

A little dot of white in the eyes really bring them to life. You can also put a little shine with white on the lips you might like that too.  To make the hair, I just painted a hair color in a little bob shape. You could add yarn, wool, or dolly hair.  I drew the hair's outline on with pencil first because I do have a tendency to get a little crazy with the paint!


Now the fun begins!  I cut a strip of fabric, there is no right or wrong here. Figure out how long you want your skirt and then cut about a 12" length. You do what works for you.  You could even use netting or soft ribbon or wide lace. The choices are endless.  I used embroidery thread to tie the skirt.  I cut about an 6" length and knotted one end and threaded it on a needle.  Gather the top edge of the skirt with this. 
Now lay your doll on the skirt face down....arrange the skirt around her so it looks nice and covers her behind!  Tie your strings together tightly and TaDaaa, she's wearing a skirt!
Now we'll put in the arms......pipe cleaner.  Cut the pipe cleaner into 2 pieces, you only need half.  Thread this  through your drilled hole.  Please be sure and line your face up so the holes are on the sides, you don't want arms coming out of her chest and back! Really you don't!
Now fold the ends in to form the hands. You'll fold them over twice. You judge how much.
Like this

Cut a strip of felt, about 1" x 3" This isn't exact science so do it however you like! Wrap it around her neck, like a shawl,  lap one side over the other. Add a dab of hot glue between the layers. 
Wrap a length of the ribbon all the way around her waist. I put a bit of hot glue on the starting spot and apply one side of the ribbon, then wrap it around and glue to finish. This keeps it taut and makes it much easier.  I did this part for my girls since I didn't want burned fingers.
Now embellish anyway you like. I had some little jewels in my stash, and I tied a cute bow for her hair and she was ready to go to a party!
You can do a multitude of things with these little dolls. If you feel so inclined you can paint "shoes" on her leg ends. She would make a fabulous Christmas tree ornament, just add a tiny eye screw to the top of her head and hang her by a pretty ribbon. Dress her for any occasion, experiment with different hair material and styles. Go have fun, make an entire debutante's ball for lovely Clothespin dolls!

Wednesday, November 9, 2011

Ok, here's the Candy Box instructions......

Start with two pieces of card stock cut to 8 3/4" x 7".  I find it best to use a pretty heavy duty card stock.


Score the box bottom @ 1" and 2" on all sides.
For the lid, you will need to make a shim that fits over your score board edge, using this, score again at 1" and 2" on all sides.


Cut out the outer 4 corners (2 squares) as shown in the diagram.

Cut each remaining set of side squares to make flaps. Cut a wedge from each flap edge as shown. This is so you can fold the box up without the bulk. It just makes it look nicer.


Fold your box on all the scored lines. You'll end up with something like this.  Now we need to  glue it all together. 
This can be interesting...Put adhesive on the outer part of the flaps.
The inside top edges will need adhesive too, so you just flip your box over after applying the flap adhesive being careful not to get it stuck to your work surface and add that adhesive to the upper edge.


Now fold in the flaps on each corner pressing them firmly.
You will now have this......
Fold the top edges down and press them firmly......

Ta-Daaa........
Do this Same procedure for the top. If you want to add stamping to your box  top, now is the time. I like to do a background type rubber stamp on the top before I fold it.  Stampin' Up has some really cute little background stamp sets.

Now the magic will begin......I'll show you how a simple box becomes a Candy Box!

Cut more card stock....
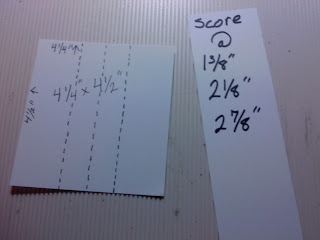
(1) 4 1/4" x 4 1/2"
(2) 9" x 1 3/8"


Score the 4 1/4" x  4 1/2" piece on the 4 1/4" side @
1 3/8", 2 1/8" & 2 7/8"


Fold on the score lines......Just like this........Set it aside for now.


Score the small long strips @
1 1/8, 1 7/8", 2 5/8", 3 3/4", 4 1/2", 5 1/4", 6 3/8", 7 1/8" & 7 7/8"
Fold it all up like shown. You're going to make little mountains and big valleys! 

Little trick here....before you put these in your box, run some really good adhesive right down the middle on the bottom!  Otherwise, they will buck up and drive you nuts! Trust me on this one!


After putting  adhesive on the larger insert, slip it into your box....as shown above.  Cool isn't it?!


After doing like I said before, put in your long skinny dividers and .......


Voila'
An amazing little Candy Box all ready for you to decorate and fill!!!  Notice the stamping done on the lid.
I should so show you the adorable stamp set from Stampin' Up that inspired this whole thing.....maybe I'll show you tomorrow.