The box is 2 inches high and 2 inches wide with a flap lid. I decorated it with red 1 3/4" squares of red paper and some little embellishments I made on my Cricut.
Here are the basic instructions so you too can make one of these honeys!
Cut a piece of heavy card stock to 8 1/2" x 7" (You need to use heavier card stock when making boxes so they are strong enough.)
Of course this project uses the scoreboard!
On the 8 1/2" side, Score@ 1/2", 2 1/2",4 1/2",6 1/2" Don't flip this side.
On the 7" side, Score first @ 1/2" then 2 1/2" and flip the paper over and do the same on the other side. Trust me on this.
This is what you'll get, well not the lovely black dotted lines and numbers, but you get the idea, right?! Notice that one end of the paper has a 1/2" score, this will make the lip for your box top.
Now break out those scissors, we're going to do some cutting.
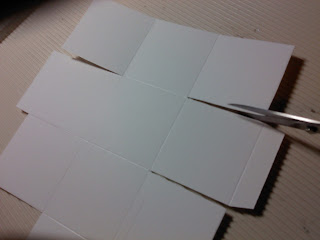
On the end with the 1/2 inch score, cut off the two outside squares, including the 1/2 on the sides. Like shown here.Next we'll cut in to make the box sides.
Cut the first square after the top flap to the middle, don't cut down from the flap, cut crosswise do this for the next square, then clip off the 1/2 area on the top of your newly cut flaps, leave the one on the middle flaps.
 |
| It will look like this before you cut the 1/2 portions off. |
 | |
| This is what you'll end up with, minus the marks of course. |
From here you need to prepare the box for folding properly by cutting little slivers from the sides of the outer flaps. Trim a sliver from each side of the 4 outer flaps and then on the 1/2" lip, cut a small corner off...like this:
 |
| See the small sliver removed on the sides. Do this for both sides. |
 | |
| Just clip the corner from the lip. |
This is the shape you should have at this point.
Now fold and crease all the scored lines and you'll have something like this.....
Turn your box over and add adhesive to the right sides of the outer flaps, then turn over and carefully add adhesive to the lip, being careful not to get the other parts stuck to your work surface.
Now fold the flaps in and press together to adhere.....
And you'll end up with.......
You can do this next step either before you add the paper squares or after, doesn't matter, you'll just be punching twice if you do it first.
Use a 3/4" punch to punch just a little half moon shape so it's easier to open the box.
Add your 1 3/4" squares of colored or decorative paper and a couple embellishments and VOILA' you have a honey of a little gift box. I'm thinking of putting Bit O' Honey candy in these.
FYI: I used the Provo Craft Create a Critter cartridge for my Cricut, and Baby Steps for the words, The Colored paper is Stampin'Up Cherry Cobbler for the red with a variety of others for the embellishments, I used a white gel pen, Stickles glitter and some googly eyes I found at Dollar Smart in Blanding, UT.
Get Creating and watch for the next little goody I pull from my bag of tricks!


so cute! You are amazing!!!!!
ReplyDeleteWay cute!
ReplyDeleteThis is soooooo stinkin' CUTE! Of course I'll just use my cricut to make the box! tehehehe But I LOVE how you decorated it.... ADORABLE! :o)
ReplyDelete