Welcome to My Bag of Tricks

This is a blog to share the things I discover, create and love. I have a passion for creating interesting things, and an equal passion for sharing how it's done! Join me on my journey, and watch what I'll pull out of my bag of tricks!

Monday, January 30, 2012

A Tour of My Unusual Bedroom.....

As promised, I am going to let you take a peek at my really strange bedroom.  It's a work in progress, so don't judge!  Here is what you'd see if you were standing in the door.....
It has a little entry hall thing going on. 
To the left there is the door, behind which is the shower....
I kind of closed the door so you can see it.
You'll see the hinge for my husband's closet. His closet doesn't go all the way to the ground, don't ask me why, the person who built it is no longer here to ask.  Hmmm, wonder if we could tear out the wall and make it a full closet?  Hmmmmm
If you were to hang a hard right after the door, this is what is there. My closet and TV. The pile of clothes belongs to my husband...we won't got there. The stack in the back is a filing cabinet with my family pictures and records, and my husband's pile of empty boxes for stuff we own. I'm thinking they will be going to the basement to live.....very, very soon. I'm standing beside my bed to take this picture.
Now, I'll show you what I have been dealing with for a sink and vanity...DO NOT laugh!  Well laugh, I do..
You can see where the water closet is to the right. Isn't that sink hideous! And I'm using this Ikea like shelving for my bathroom/grooming stuff. It is very annoying to say the least. I can't wait to put in my new set up.

Here's a shot of the infamous "Water Closet"!  It had carpet in it, but I think bathroom carpet is disgusting so I pulled it out and found ancient linoleum...the real thing, not vinyl, linoleum!  It is kind of pretty, but in bad shape.
this has a little accordion fold door on it.


 If you were sitting on the edge of my bed, this is what you would see.  My roll top desk which is covered with my 11 1/2" doll collection and a couple other dolls.  There are some built in shelve above it that hold pictures and little sweet things that people have given me.  I plan to put my treadmill beside this, where the clothes basket is now.  That way I can watch the tv while I walk. I hate walking outside in the winter, I have an aversion to falling on the ice we get in our driveway.
You'll notice the entire room is paneled in gray paneling, I would change it, but that would require money and time I'm not sure I'm willing to devote to doing drywall, plus, that sounds an awful lot like WORK!
But, I did purchase some beautiful fabric to make curtains...
I love florals and I love blue and blue looks good in my gray room.  I'll post pics when I get them made. That will probably be in the next few weeks. I have other projects on my schedule too.

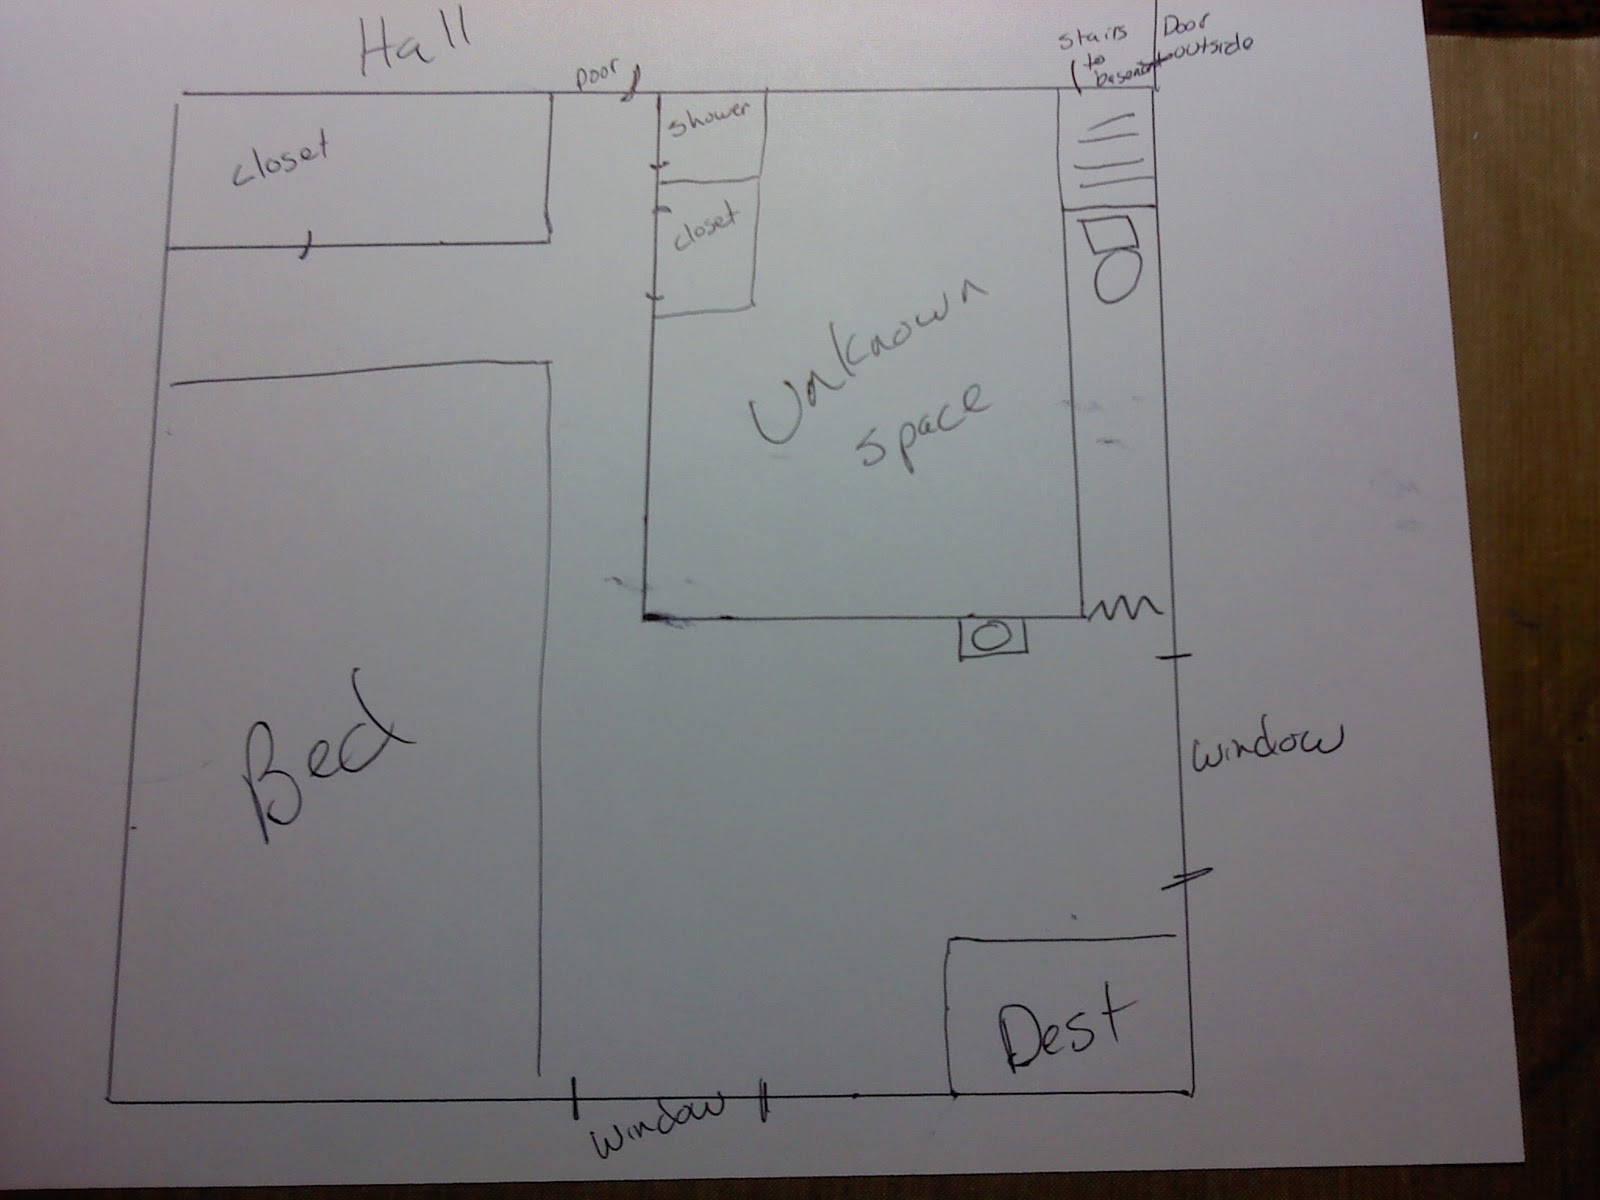
Here's a diagram of my room so you can visualize it better.
I think the stairs to the basement may occupy the unknown space, the first set of stairs is behind my water closet.
Well the Louvre this ain't, but it was a tour none the less.

Thursday, January 26, 2012

What happens when I get obsessed!

I've been so obsessed with avoiding Hoarderhood that I've forgotten to post anything on my blog in WAY too long.  I have been mildly absorbed with getting rid of excess stuff and making my living space more liveable.  My room has been a source of embarrassment for longer than is mentally healthy, but no longer....Want a tour!  I've been making plans to do some cool decorating in my boudoir. Let me explain a bit so you understand....Like I said, I live in my Grandma and Grandpa's old house. My Grandpa (bless his heart) was a cowboy, and an amazing innovator and being such, some stuff in my house is beyond interesting. Take my bedroom for one. He wanted to have a master bathroom so he went about creating one.....kind of.  He had several small closets in the room so he simply modified them to accommodate bathroom accoutrements!  I have a wonderful walk in shower right behind my bedroom door. And in the back of my bedroom in a very narrow former closet, I have what I refer to as my water closet.....A toilet and a generous towel cupboard!  But the thing that probably is strangest is the bathroom sink on one of the walls of my bedroom.   I guess he ran out of spare closets.  I loathe the sink and vanity, they are UGLY!!! But, genius struck and I know what I'm going to do.  I was given an antique cabinet thing which I'm going to turn into my vanity complete with an artful bowl sink and faucet.  I may have to live like I'm in a motel, but it will be a stylish motel! 
Tomorrow I'm off to crop 'til I drop with my fab group of friends, that should inspire some creativity for sure. Look for some interesting things from my bag of tricks next week.
I'll leave you with a cute picture of my furry baby....Alexander......
Peeking over the kitchen table hoping I'll toss him a treat!Yes, He's spoiled!

Saturday, December 31, 2011

A Little History Found in Grandma's Closet.....

Having my youngest daughter home for the holidays has been awesome, it has also been very productive. We've managed to de-junk and de-clutterize (my new word) both my kitchen and bedroom.  For those who don't know, I live in my Grandma and Grandpa's old home. I love it even though it is a little rustic, it has character. Well, I use Grandma's closet, and there were a few things left on the back of one of the shelves, not things of great monetary value, just interesting.  I'm also a huge newspaper lover and was thrilled to find this San Juan Record from February 3, 1972!!  It's in rough condition, but I was delighted with the walk down memory lane. I even found my cousin in one of the pictures! 
Although we change, this picture of the Goosenecks remains timeless and unchanged!

I was tickled to find proof that Monticello did indeed have 3 grocery stores once upon a time.....
Jensen's which was located where Blue Mt. Foods is today

Monticello Merc, located, well where it is today but with food and clothes and stuff!

And Blue Mountain Foods, located where the new Maverick sits today. Remember Clare Toppance?
And how many of you remember this guy? 
The teacher who inspired me to read the classics... Mr. Morris Nelson! We multi task here on the frontier.
Of course my reading and my daughter's reading were influenced by two of the people in this next one....Do you remember these people? Give you happy feelings?
L-R Hal Jensen, our elementary principal, Marilyn Hugentobler (who taught my daughter in 2nd grade) and of course Mr. Harold Allen....our librarian. He inspired me to read new and exciting things, I loved his reading voice, it was comforting to me and I looked forward to library time every week.
Nell's Newsy Notes kept us all in the loop here in Monticello.....
And the Old Settler, Albert R. Lyman...
What's not to love about his writing?
Parley Redd Merc in Blanding always did full page grocery ads, I even went on to make their ads for a while when I worked for the San Juan Record during the early 80's
This is just the upper left hand corner, like I said, the paper is in sad shape.
Sports can't be forgotten.....And this needs remembering....Monticello beat San Juan in basketball!
And the girls in both towns, did drill team....I loved watching them kick in precision, and the splits!!!! WOW and ow.
Monticello Drill Team....At one time they were known as the Buckettes, but thankfully they changed that. I mean really....Buckettes?

And you had the San Juan Broncettes.....kind of explains the MHS name...well a little. No matter what they were called, they were amazing to watch.
This is really blurry, but I thought it was interesting to note...We did have a theater down town at one time, next door to the pharmacy. I loved it, and I loved the Drive In movies too. Remember those? They're a horse pasture now with only a little evidence of the Drive In remaining.
You'll notice Jack Hazen won a free show if he brought in the ad.....wonder if he did? And, who is Jack Hazen? Anybody?
And now, the article that really inspired me to share...
This is a picture of some of the girls who were involved in the Mini-Course Quilting. They are left to right:
Patty Black, Mitzi Bond, Brenda Gardner, Liz Trujillo, Lisa McDonald, Joy Randall & Arlene Howesa.
I remember tying quilts at noon hour with Mrs. Jensen, I think that's when these quilts were worked on a lot since mini courses only were an hour a week.  I loved Mini-Courses with all my heart, and took archaeology more than once. Do you remember Mini-Courses? I think they should do them again....I would volunteer to teach one!

So now you've peeked into my past and the past of our town....gained new insight into what made me Me!  get it Mimi. Haaahaa    I always have something in my bag of tricks! 
HAPPY NEW YEAR!!!....I'm off to party with my BIG Family!!!

Saturday, December 24, 2011

The Last Christmas Project.....Finished!!!


I think I live for pressure! I like that push/thrill you get when you have lots of things to get done.  Well, to a point!  I thought I had Christmas in the bag, all I had to do was make some candy and wrap some gifts....but you know how the best laid plans  go.....Someone called and needed some candy boxes...Sure! I can do that, no problem, and it really wasn't, I can do my stuff later right?  Then someone came by my work and wanted a pair of pajamas made to match her daughter's American Girl Doll.....Easy job, I can do that....really I can....and I did!  See........

And, I think I have all my presents wrapped and under the tree, today I'll finish delivering my wee chocolate boxes and Then I'm going to take a bit of a rest before I fill my time up again.

See my very cluttered work area....I think after Christmas and New Year I'll put all the project stuff away and vacuum!


MERRY CHRISTMAS AND A HAPPY NEW YEAR!!!!!

Thursday, December 15, 2011

When Inspiration strikes!

My job really has absolutely nothing to do with crafting.....NOTHING. I work in a Honda motorcycle dealership just so's you know....anyway, I changed the tape in our packing tape dispenser the other day and just as I finished a customer walked in. I put the empty tube on the counter and promptly forgot it....this explains my house really....So this morning as walking by the counter, I notice the forgotten tube and one of those amazing creative inspirations strikes.  There lays an awesome potential craft item...and it was free!!!!! I tried it on my arm and it fit....hmmmm, creative inspiration started stirring in my brain and well.....I'll let you see what happens in the next few days. I'm extremely busy for the next couple days, but the ideas are just whirling in my head.....Here's the aforementioned tube......What do you think?
Yes, this is my desk at work, and now I'll get back to work!

Saturday, December 10, 2011

The Ornament Box...

I must tell you, when I get a new tool, I will use it to create everything I can imagine.  My newest tool is my scoreboard....First it was candy boxes now I've designed an ornament with it! Yes, an Ornament!
It's basically a cube that holds candy or whatever little trinket you want to hide inside. Here are your basic instructions with illustrations.  Sorry if they are a little blurry, I used my phone camera, and it was a little late, I start melting down as the night goes by...

Start with 2 pieces of sturdy cardstock. I prefer using what Xpedx calls "Coverstock". It makes a nice base for your ornament or your boxes.
Cut these pieces to 7"x7", nothing hard with that!   Now you'll score it..... Score each side @ 1/2" and 21/2". Do this for each side, don't be clever like I was and just count over and score every 2" after the 1/2" score, it makes your box all wonky!  Trust me on this! This first scoring will be for your bottom. The lid will require that you shim it before you score. Shims are not quite 1/8" so don't just move your paper to that mark. If you email me, I'll try to give you instructions on making a shim for your scoreboard. Every brand is a little different.
You'll end up with a grid pattern like this. (without the dotted lines, I did those for illustration purposes.) 
Now, cut flaps on each side, you'll end up with 4, just like on the candy boxes. You will be cutting a little sliver out of the side of each flap, and cutting off the 1/2" around the flap. Leave it on the box sides, this will make your rim flaps that you will fold over.
Like this, on both sides.  See the little sliver removed from each side?
You will also cut that flap so it's not quite so long, cut it off about 1/4 of the way in, this make the box less bulky. See what I mean, it's just a little shorter. Don't worry about how straight it is, nobody sees that part. Also, you will cut a little snip from each corner of the rim flap You'll notice one is already on the table and I'm snipping another. Do this on all the rim flaps. This makes them fold in smoother and gives it a more finished appearance.
You'll end up with a shape like this.    Fold the box on each score line and crease with your bone folder.
At this point, your box should look like this.......
Now you're ready to glue it together.  Just like on the candy boxes, you put adhesive on the outside of the flaps, flip the box over and apply it to the inner part of the box rim flap.
I love my ATG tape runner! Just sayin'
Fold each flap inside the box and position it so it's all straight.
Just be careful as you do this because the adhesive has a mind of it's own! 
Your box will look like this now....  Fold in those rim flaps and rub a bone folder over the rim inside to make sure it's good and stuck!
Here's what you should have now....

Assemble the other one and then slide them together. The fit will be snug!
  To make this into an ornament, you'll need a few tools....A pair of pliers (I use my mini leatherman) A large needle, a push pin and some metallic cord or string.
I use the push pin to start the first hole. You want the ornament to hang from it's corner so you will be poking a hole from one bottom corner to the one beside it.  Like this.....
Use your push pin  to start that first hole, then hold your threaded needle with the pliers and push it through all layers to the opposite side. The box bottom will be attached, but that's fine. Pull the needle and cord through with the pliers also.


Hopefully your ornament looks like this now!


Tie an overhand knot in your cord and you're ready to decorate.

Cut 6 little 1 3/4"  squares of  pretty paper, or plain. I did a couple plain ones, but sprayed them with a smooch spray.  Smooch spray......aaahhh.....that's a whole post by itself. You should try it!  But I digress....again...
Two of the squares will need to have a corner snipped to accommodate your hanging cord.

I didn't add embellishments to the box bottom so it's easier to open and you have something to sit it on. Add embellishments of your choosing to all the other sides. I cut mine on the Cricut using a variety of  cartridges.


I made one of these for each of my daughter's roommates and of course one for her! I filled them with the Cadbury chocolates for Christmas. They're like the Cadbury mini eggs.
I'm going to make one for each of my nieces and nephews!  I can picture so many different embellishments and papers..........hmmmmmm..........I feel a creative mist falling all around......Now go and be creative!