Start with two pieces of card stock cut to 8 3/4" x 7". I find it best to use a pretty heavy duty card stock.
Score the box bottom @ 1" and 2" on all sides.
For the lid, you will need to make a shim that fits over your score board edge, using this, score again at 1" and 2" on all sides.
Cut out the outer 4 corners (2 squares) as shown in the diagram.
Cut each remaining set of side squares to make flaps. Cut a wedge from each flap edge as shown. This is so you can fold the box up without the bulk. It just makes it look nicer.
Fold your box on all the scored lines. You'll end up with something like this. Now we need to glue it all together.
This can be interesting...Put adhesive on the outer part of the flaps.
The inside top edges will need adhesive too, so you just flip your box over after applying the flap adhesive being careful not to get it stuck to your work surface and add that adhesive to the upper edge.
Now fold in the flaps on each corner pressing them firmly.
You will now have this......
Fold the top edges down and press them firmly......
Ta-Daaa........
Do this Same procedure for the top. If you want to add stamping to your box top, now is the time. I like to do a background type rubber stamp on the top before I fold it. Stampin' Up has some really cute little background stamp sets.
Now the magic will begin......I'll show you how a simple box becomes a Candy Box!
Cut more card stock....
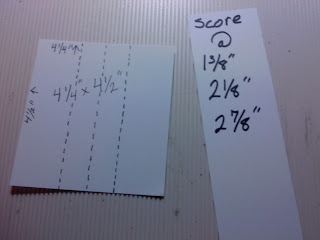
(1) 4 1/4" x 4 1/2"
(2) 9" x 1 3/8"
Score the 4 1/4" x 4 1/2" piece on the 4 1/4" side @
1 3/8", 2 1/8" & 2 7/8"
Fold on the score lines......Just like this........Set it aside for now.
Score the small long strips @
1 1/8, 1 7/8", 2 5/8", 3 3/4", 4 1/2", 5 1/4", 6 3/8", 7 1/8" & 7 7/8"
Fold it all up like shown. You're going to make little mountains and big valleys!
Little trick here....before you put these in your box, run some really good adhesive right down the middle on the bottom! Otherwise, they will buck up and drive you nuts! Trust me on this one!
After putting adhesive on the larger insert, slip it into your box....as shown above. Cool isn't it?!
After doing like I said before, put in your long skinny dividers and .......
Voila'
An amazing little Candy Box all ready for you to decorate and fill!!! Notice the stamping done on the lid.
I should so show you the adorable stamp set from Stampin' Up that inspired this whole thing.....maybe I'll show you tomorrow.


Cute! Thanks for sharing your amazing work. :D
ReplyDeleteThank you so much Mimi for sharing. I know it took lots of work to give us the instructions. I can't wait to make some!!
ReplyDelete